
Parent workspace · 3 min read
Take a photo or upload an image
Photograph a receipt or document, review it, and keep the original in your case.
Updated · Website and iOS workspace
Before you start
Check the selected case. Use a cloud account to retain the original file in your case. A local preview retains file details only; keep the original on your device.
Follow these steps
Choose your starting point
For a new image, open Add records → Take a photo → Open camera. Your device may offer the camera or an existing image picker. For an existing picture, you can also use Add records → File, choose Document or photo, and select the image.
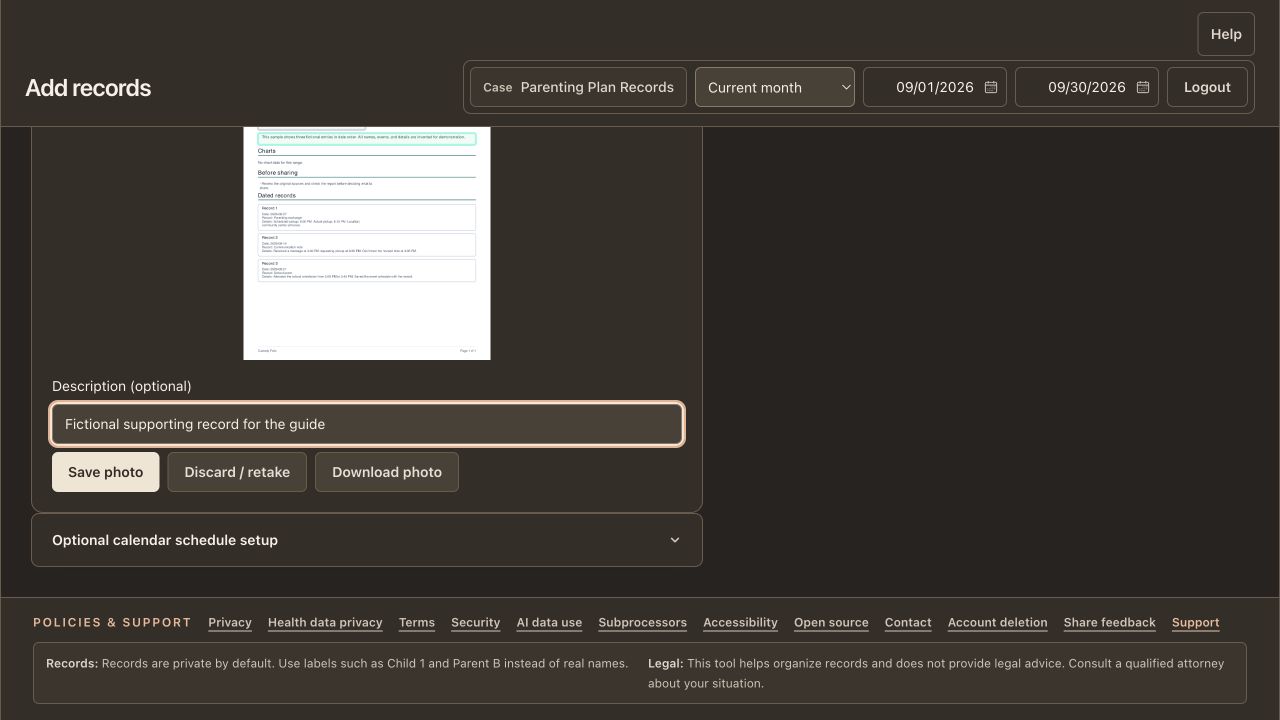
Review the image
Check that the useful information is readable and the image is the one you intended. Use Discard / retake before saving if you need a different image. Do not discard your only copy of an original you need to retain.
Add context
In Take a photo, add an optional description explaining what the image contains. This shortcut uses today's date for the case. The File upload form lets you set a record date, description, tags, and report-file-index inclusion before uploading.
Save and wait
Choose Save photo, or Upload files in the File form. Keep the page open while validation, scanning, and saving finish. The photo flow confirms Photo saved to Files & evidence. Download photo can keep a local copy while the preview is still open.
Check the saved file
Open Files & evidence and find the image. Use Edit file information to correct the record date or description and review its report inclusion. Use Download to retrieve the saved original. A description or review label does not change the image itself.
Check that it worked
The image appears in Files & evidence with the intended date and description, and its original is available to download. Taking a photo does not automatically create an event note.
An example to follow
Fictional example: photograph a school-supplies receipt and describe it as School supplies receipt — September 12. Add the expense amount in Expenses separately. If the receipt belongs to an event, attach it from that Event form before saving the event.
If you get stuck
The camera does not open.
Check the device's camera permission for the app or browser, or choose an existing image. The exact picker and permission screens depend on your device.
The image will not preview.
Read the format message. Some devices cannot display a supported original format inline. Keep the original; use a JPEG or PNG copy when you need a broadly viewable image, or retake it. A missing preview alone does not confirm that a file saved.
The date is wrong or the file is missing from a report.
Open Edit file information and check the record date and report-file-index inclusion, then check the report's date range. The direct photo shortcut starts with report inclusion off. Review the report preview before exporting.
Watch the walkthrough
Videos include captions and written transcripts.
Related guides
Still need help? Contact support with the screen name and error wording. Leave out private case details. These instructions explain the product and do not provide legal advice.